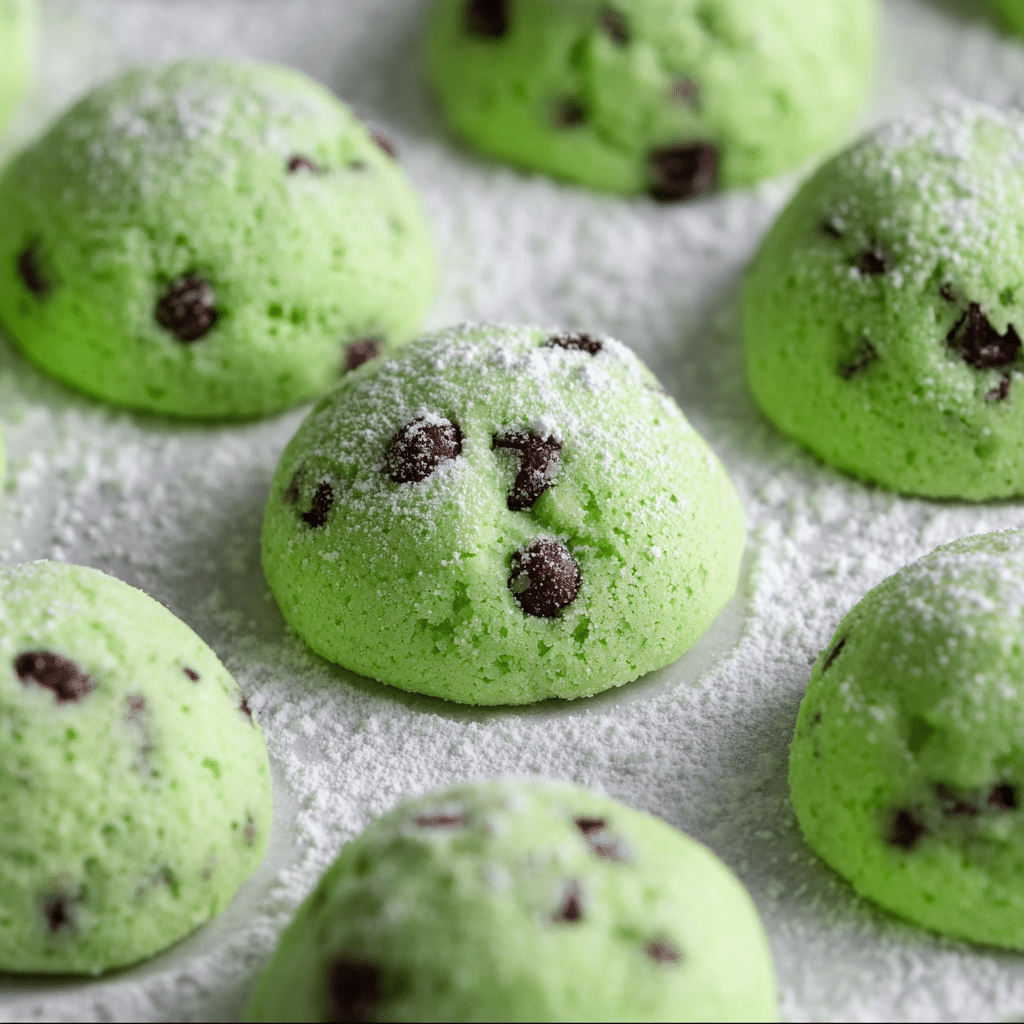
If there’s one cookie you absolutely need to experience, it’s Mint Chocolate Chip Snowball Cookies. These buttery, melt-in-your-mouth treats combine the cool zing of mint with decadent chocolate chips, all wrapped up in an irresistible powdered sugar coating. Whether you’re baking for St. Patrick’s Day, sharing a festive platter at Christmas, or just indulging your own sweet tooth, these cookies never fail to impress and delight anyone lucky enough to grab one.
Ingredients You’ll Need
The ingredient list is simple, but each item plays a crucial role in building the flavor, tender texture, and signature appearance of Mint Chocolate Chip Snowball Cookies. Even the food coloring helps transform a classic into something simply magical for any occasion!
- Unsalted butter: Room-temperature butter is the backbone for that rich, melt-away texture.
- Powdered sugar (confectioners’ sugar): Both sweetens and helps deliver the classic “snowy” exterior after baking.
- All-purpose flour: Gives the cookies just enough structure, so they stay soft but still hold their round shape.
- Salt: A little goes a long way; it balances the sweetness and heightens the mint and chocolate flavors.
- Mint extract or peppermint extract: The shining star, bringing all the cool, refreshing flavor the cookies are named for.
- Green food coloring (gel food color is best): Adds a festive, unmistakably minty hue — start with a few drops and build up!
- Mini chocolate chips: Sprinkled throughout each bite for decadent pops of chocolate.
- Additional powdered sugar: For coating, to give that signature snowball look and a touch of extra sweetness.
How to Make Mint Chocolate Chip Snowball Cookies
Step 1: Prepare Your Baking Sheets
Line a large cookie sheet with parchment paper to ensure your cookies don’t stick and bake evenly. Set it aside so you can focus on putting together your dough without any last-minute scrambling.
Step 2: Cream Butter and Sugar
In a large mixing bowl, beat the softened butter and powdered sugar until the mixture is super light and fluffy. This step sets the stage for a tender, melt-in-your-mouth cookie — don’t rush it!
Step 3: Mix in Dry Ingredients and Mint
Add the flour, salt, and mint extract to the creamed butter mixture. Gently mix just until everything comes together; overmixing here could toughen your cookies. If using peppermint extract, remember it’s quite strong, so start with the recipe amount and adjust to taste in future batches.
Step 4: Add Food Coloring
Add a few drops of green gel food coloring and mix just until the color is even. Use as much or as little as you want for a pale green or brighter pop — your Mint Chocolate Chip Snowball Cookies, your shade!
Step 5: Fold in Chocolate Chips
Gently stir in the mini chocolate chips, making sure they’re evenly distributed through the dough. You don’t want to overmix at this stage — it’s all about delicate handling!
Step 6: Shape & Chill the Dough
Scoop out dough by the tablespoon, rolling each scoop gently between your palms into perfect little balls. Place them on your prepared baking sheet, cover, and refrigerate for at least 30 minutes. Chilling helps keep the cookies from spreading and locks in that tender crumb.
Step 7: Bake!
Preheat your oven to 375°F. Once the dough balls are chilled, bake them for 7 to 8 minutes. Keep an eye out — you want them just barely turning golden on the bottoms. Let them cool on the baking sheet for 5 minutes before moving to the next step.
Step 8: Powdered Sugar Coating
Dust another baking sheet with powdered sugar, then transfer the warm cookies onto it. Sprinkle more powdered sugar over the top for that iconic snowy finish. Let the cookies cool completely before moving on.
Step 9: Second Powdered Sugar Dip
Once totally cool, give each cookie one last tumble in a bowl of powdered sugar. The double layer gives Mint Chocolate Chip Snowball Cookies their classic, irresistible appearance and just the right touch of sweetness in every bite.
How to Serve Mint Chocolate Chip Snowball Cookies

Garnishes
For a little extra flair, try topping your snowballs with a tiny sprig of fresh mint or a dusting of edible glitter. A few extra mini chocolate chips pressed gently on top before the final sugar coating can also make each cookie extra cute and inviting.
Side Dishes
Cookies are perfection with an ice-cold glass of milk or a cozy mug of hot chocolate, but you can also serve Mint Chocolate Chip Snowball Cookies alongside a fresh fruit salad or even a scoop of vanilla ice cream for a dreamy dessert combo.
Creative Ways to Present
Arrange these colorful cookies on a vintage platter for a holiday party, box them up in parchment for a gorgeous edible gift, or layer them in glass jars tied with ribbon for a simple but stunning presentation at bake sales and family gatherings.
Make Ahead and Storage
Storing Leftovers
Keep your leftover Mint Chocolate Chip Snowball Cookies in an airtight container at room temperature. They’ll stay fresh and soft for up to four days, making them ideal for baking ahead and gifting — if they even last that long!
Freezing
To freeze, simply let the cookies cool completely, then arrange them on a baking sheet and freeze for 30 minutes to prevent sticking. Transfer the chilled cookies to a freezer-safe zip-top bag and they’ll keep beautifully for up to three months. Thaw at room temperature and add a fresh dusting of powdered sugar before serving if needed.
Reheating
Melt-in-your-mouth means these cookies truly don’t need to be reheated, but if you want that just-baked aroma, pop them in a low (250°F) oven for 2–3 minutes. Let cool a minute before rolling in a little more powdered sugar to restore the snowy look.
FAQs
Can I use regular chocolate chips instead of mini?
Absolutely! While mini chips distribute more evenly, regular morsels work in a pinch. Give them a rough chop so the chocolate doesn’t overpower the cookie texture.
What’s the difference between mint and peppermint extract here?
Mint extract has a balanced mint flavor, while peppermint is more intense and slightly sweeter. Use whichever you prefer, but if you like a milder mint, stick with mint extract for these cookies.
Can I make these cookies ahead?
Yes! You can prep and roll the dough balls a day in advance and keep them covered in the fridge. Bake and coat them in powdered sugar when you’re ready to serve, and they’ll taste freshly made.
Do I have to use food coloring?
Not at all. The food coloring is just for that fun, festive appearance. The cookies will still taste amazing and have all the minty, chocolatey goodness even if you skip the dye.
Can I double the recipe?
This recipe scales up beautifully! If you’re planning a party or want plenty for gift giving, simply double all the ingredients and bake in batches as needed.
Final Thoughts
Give these Mint Chocolate Chip Snowball Cookies a try the next time you want to share a little sweetness and minty joy. They’re wonderfully easy, beautifully festive, and bound to be a hit with anyone who loves a classic cookie with a fresh twist. Happy baking!
PrintMint Chocolate Chip Snowball Cookies Recipe
Melt in your mouth Mint Chocolate Chip Snowball Cookies are a treat you won’t be able to resist! So easy to make and packed with mint and chocolate flavor – no one can eat just one! Perfect for St. Patrick’s Day, Easter, Christmas and more!
- Prep Time: 10 minutes
- Cook Time: 8 minutes
- Total Time: 18 minutes
- Yield: 30 cookies
- Category: Dessert
- Method: Baking
- Cuisine: American
- Diet: Vegetarian
Ingredients
- 1 cup unsalted butter, softened
- ⅔ cup powdered sugar, sifted
- 2 ¼ cup all-purpose flour, spooned and leveled
- ½ teaspoon salt
- 1 teaspoon mint extract or peppermint extract
- Green food coloring gel
- ¾ cup mini chocolate chips
- Additional powdered sugar for coating
Cookies:
Instructions
- Line a large cookie sheet with parchment paper and set aside. Beat the butter and powdered sugar until light and fluffy.
- Mix in the flour, salt, and extract just until combined.
- Add the green food color a few drops at a time until your desired color is achieved.
- Stir in mini chocolate chips.
- Scoop out one tablespoon of dough at a time and form into a ball. Place balls on the prepared cookie sheet.
- Cover and refrigerate dough for at least 30 minutes.
- Preheat oven to 375°F.
- Bake cookies for 7 to 8 minutes. Do not overbrown.
- Line another large baking sheet with parchment paper, dust with powdered sugar, and place cooled cookies on it. Dust with additional powdered sugar.
- Let cookies cool completely.
- Fill a small bowl halfway with powdered sugar. Drop cookies into the bowl and turn until coated.
- Store in an airtight container for up to four days.
Notes
- Store leftovers in an airtight container for up to four days.
- To freeze: Let cookies cool completely, place on a baking sheet and flash freeze for 30 minutes. Transfer cookies to a freezer-safe ziplock bag and freeze for up to 3 months.
Nutrition
- Serving Size: 1 cookie
- Calories: 122 kcal
- Sugar: 5g
- Sodium: 43mg
- Fat: 7g
- Saturated Fat: 5g
- Unsaturated Fat: 2g
- Trans Fat: 0g
- Carbohydrates: 13g
- Fiber: 1g
- Protein: 1g
- Cholesterol: 17mg


